Team Foundation Server XAML Builds
Today we have released an update for Team Foundation Server XAML activities for FinalBuilder 7 and 8. These updates are to deal with conflicts caused by GAC installing these activities.
Since 2010 Team Foundation Server has allowed custom activities to allow provide extra functionality in XAML build workflows. For those that have not had the (dis)pleasure, XAML workflows can be difficult to work with. To alleviate this pain point we implemented XAML build templates and custom activities to allow people to run any FinalBuilder script within the build workflow without the need to edit XAMAL. Customers we have talked to say this simplifies their TFS XAML build workflows a great deal.
In previous releases, FinalBuilder’s installer automatically installed the TFS XAML activity into the GAC. The version of the activity installed was based on the TFS Agent detected on the machine in question. Installing into the GAC was done to simplify the process. This way the developer would simply use the activities in their build workflow and it would be picked up through the GAC.
With the introduction of the new TFS build in TFS 2015 and TFS-Git in TFS 2013 this is no longer advisable. In the case of TFS-Git Workflows, assembly conflicts can cause assembly load issues. If the activity requires a different assembly version to those already loaded by the TFS agent, you would see assembly load errors with lib2gitsharp. With TFS 2013 having five updates this is increasingly possible .
The way to avoid any assembly loading issue for custom activities is to use “version control paths for custom XAML activities”. To be clear, we have left the GAC installation option in both FinalBuilder 7 and 8. We however do recommend switching to using custom XAML activity paths, especially if you’re using TFS-Git.
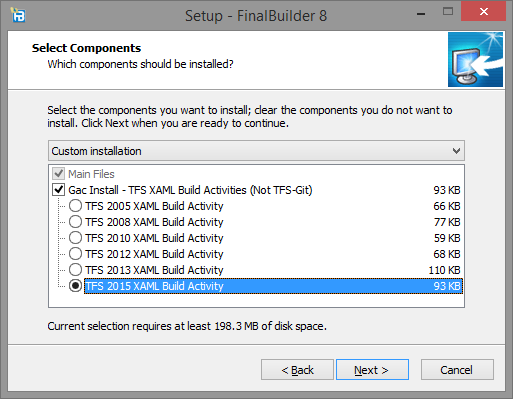
To this end, the FinalBuilder installers now give the option as to whether to install the XAML build activities into the GAC or not. Only FinalBuilder 7 will automatically install TFS activities into the GAC for TFS 2012 and earlier agents, with FinalBuilder 8 you much chose whether to GAC install the assemblies.
Note that if activities were previously installed in the GAC restarting the TFS Build Controller is required. This refreshes the build controller and releases any assemblies that it may have previously loaded.
Creating a build definition
The creation of the build definition is exactly the same as before. If you’re interested in how to setup a build definition from scratch using the FinalBuilder XAML templates please review the “FinalBuilder and Team Foundation Server” article.
Custom XAML activities
Version control paths for custom XAML activities is a feature in TFS XAML build controllers. This feature allows the build controller to source all assemblies required for an activity from a known location. If a required assembly is missing from this location the standard .Net assembly lookup methodology is used.
Using version control paths for custom XAML activities requires the activity assemblies to be added to a repository on the TFS system. This repository can be shared with other code, or can be a repository just for the assemblies. As the custom folder does not change based on the build being performed, we suggest a separate TFS repository for the custom activities. The repository can also be either a TFS or Git-TFS repository. Both will work the same.
To add the custom activity assemblies to a repository connect to the repository through team explorer in visual studio.
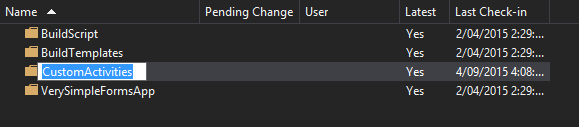
In the source control view create a new folder that will hold the custom activity assemblies.
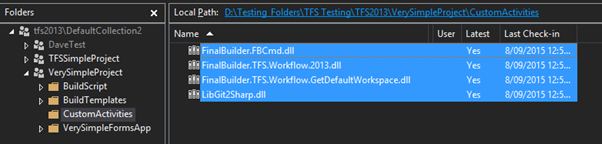
In the GAC sub-folder in your FinalBuilder installation (typically “%ProgramFiles(x86)%\FinalBuilder 8\GAC\”) there are folders for each version of TFS custom activities are provided for. From the folder relating the TFS version copy all assemblies contained within into the newly created repository folder.

From the source control explorer add these files to source control.
Updating the XAML Build Controller
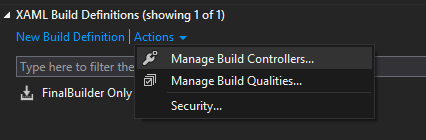
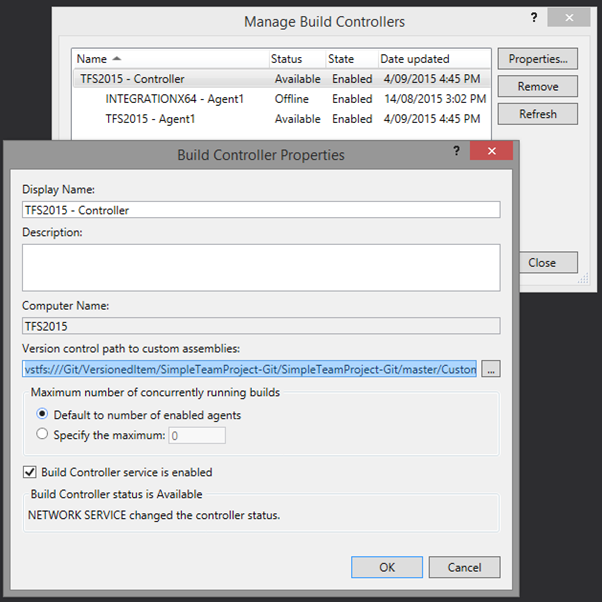
Next the build controller needs to be configured use the repository location. In the builds tab of team explorer click on the “Actions” link. A drop down will appear with the option to “Manage Build Controllers…”. Click the “Manage Build Controllers…” menu item.
From the build controllers window that opens select the build controller responsible for the FinalBuilder builds. If there is more than one controller simply follow these steps for each controller. Next click the “Properties” button.
This will present the build properties dialogue in which the “Version control path to custom assemblies” can be set. Select the folder that was created in the repository that is responsible for the custom activity assemblies. Now confirm this change by clicking OK on the build controller properties dialogue.
This has now setup the build controller to source custom assemblies from the configured repository folder. The most recent checked in assemblies will always be sourced. Therefore keeping this repository folder in sync with the custom activities used in build workflows is very important.
Once the custom path is set the build controller can run builds using the custom activities. To test simply queue a build using the FinalBuilder custom activities.