FinalBuilder offers you tight integration into TFS with an easy to understand IDE. In this post I will go into how to integrate FinalBuilder into your TFS build process. The post will cover;
To make sure this post doesn't rival "war and peace" in size, I will assume a few things during the post. Namely that you have used TFS in some fashion, and/or have gotten a solution building under TFS with the default TFS template. For more information on getting up and running with TFS and common issues with TFS I suggest taking a look at the TFS ranger books and blog.
Prerequisites
To follow along with this post you will need the following installed:
The Team Foundation Server can be of any configuration as long as it has at least one agent and a reporting service. FinalBuilder 7 is required on the agent machine, and could also be installed on the developer’s machine for editing of scripts. Agents for Microsoft Visual Studio 2013 will provide access to VSTest.Console which we require for testing on the build agent. Lastly, Team Explorer is required for interaction with source control from FinalBuilder’s IDE. Without this installed source control will need to be done manually.
To start I have a solution under source control on a TFS 2013 collection. The solution I will be using is under a team project called VSoftSFTPLibrary under the collection “TFS2013\DefaultCollection”. The layouts of the team project looks like the following:

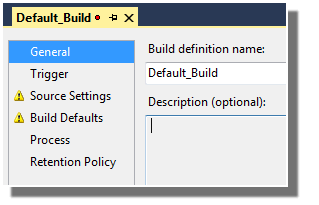
I have a directory for the SFTP projects source, library files and its tests. The layout of your source control may vary from mine, however the main point to note here is that separating out directories isn’t an issue. With the solution, all related files, and binaries under source control I now add a build definition to the team project.
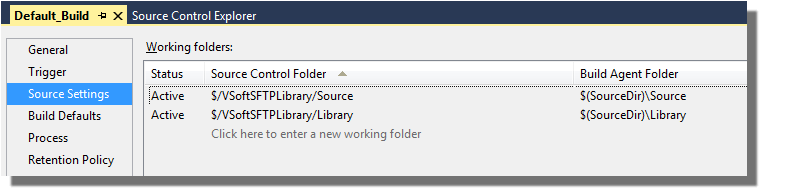
Next the folders to be used in the FinalBuilder script need to be mapped from the server to an agent location. It’s important to map all folders which contain files required for the build process. At this stage we only really know of the Source directory we are going to be build and the Library folder which the source relies on. Note that if your solution relies on a certain structure of folders this structure should be the same when it arrives on the agent. In the example the source and library paths are at the same folder depth, therefore this is reflected on the agent side.
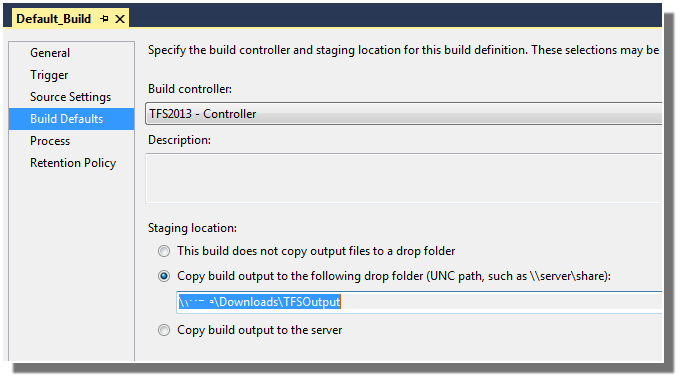
When the build is finished usually we want them “dropped” somewhere on the network. A FinalBuilder script can use this drop location, which we will go into later on in the artcile. For now I set this to a server location accessible by the build agent service user.
By default the build process is set to the default build process which comes with TFS2013. The template is called “TfvcTemplate.12.xaml”. When used the default template will enable the building, testing, impact testing, and deployment of a solution and its projects. Our aim is to perform all the same build activities with the additon of a FinalBuilder project.
To this end, the build process template needs to be changed over to one of the two supplied with FinalBuilder. In the [%ProgramFiles(x86)%\FinalBuilder 7\TFS Templates\2013] folder there are two TFS 2013 build workflow templates. “FinalBuilderTFS2013Build.xaml” performs all the same steps as the default build workflow and adds a FinalBuilder step just after the MSBuild activity and just before the optional “after MSBuild script”. This script is typically used by those looking to convert current default script builds to FinalBuilder in a simple and piece-meal fashion.

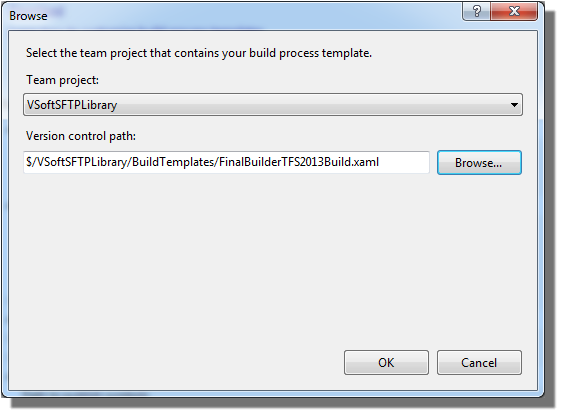
The “FinalBuilderOnlyTFS2013Build.xaml” template is used when the FinalBuilder script is to take over the entire build process. For the moment I will use the “FinalBuilderTFS2013Build.xaml” script. Add these two scripts to the team project, typically under a BuildTemplates folder to separate them from the source and library code.

Copy these templates into the local mapped location for this team project, and check them into source control. Now the “FinalBuilderTFS2013Build.xaml” template can be selected as the build process template. To do this add a new new build in the process section of the build definition. Navigate to the source control location where the template is stored and select it.
The next step is to fill in the parameters for the build process. The majority of these are the exact same as the default TFS 2013 template with the addition of some FinalBuilder specific settings. The FinalBuilder section of settings allow for the specification of the project file, and custom arguments for the FinalBuilder project. Note that the “2. Build | Projects”, and the “6. FinalBuilder | Project File” are both required by the build template. These are used to determine what should be built and what FinalBuilder project should be run.
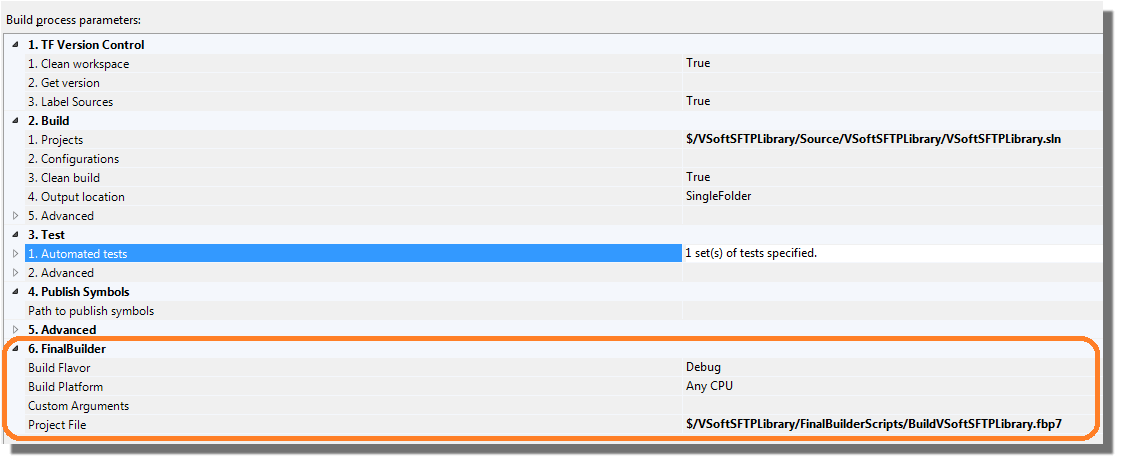
To run a FinalBuilder project we need to create one. Therefore create a FinalBuilder project with just an [Action Group] action for the moment. Save this project to the team projects FinalBuilderScripts folder and check it into source control.

Once the FinalBuilder project is in source control select it in the build process using the file selector provided through the ellipse selector. You should end up with something reading like this “$/VSoftSFTPLibrary/FinalBuilderScripts/BuildVSoftSFTPLibrary.fbp7”
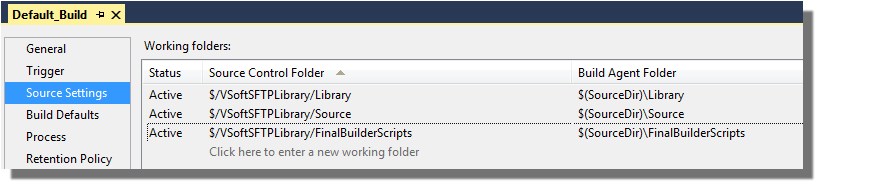
Now that we have included the FinalBuilder project into our build process we need to make sure its folder is mapped to the agent. Open the source settings section, and add a mapping for the folder in which the FinalBuilder project resides. Something like the following should be what results.
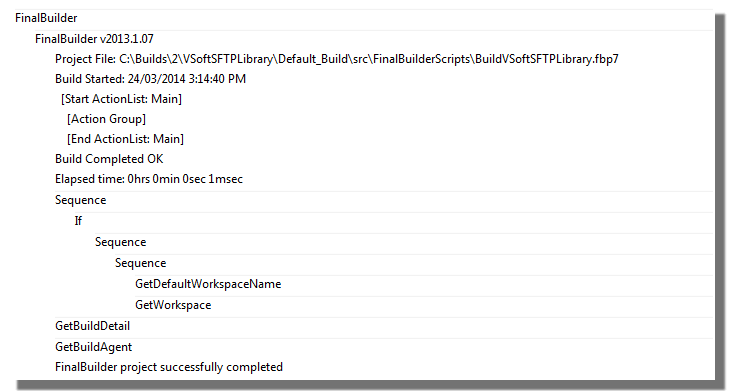
Queue the build and the log should read like the following excerpt. The [Action Group] line is the action group you added in the FinalBuilder project.
So now we have a TFS build process which is able to call a FinalBuilder script. In the next section we will delve more into how to extract information from TFS about the build inside our FinalBuilder script.
Retrieving information from TFS in a FinalBuilder Script
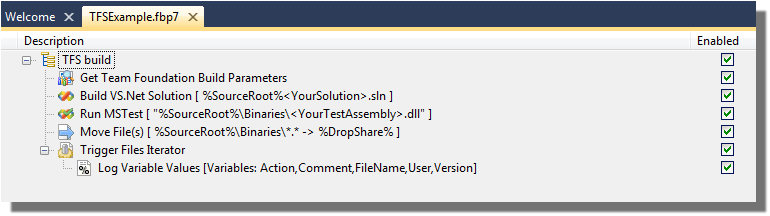
For the FinalBuilder script to be of use in the TFS build process, it requires information about the TFS build currently running. To provide this we offer a number of actions that can extract this information during the TFS build run. To get you started, there is an example project in \TFS Templates called TFSExample.fbp7. This sample project contains examples of the actions to use during a TFS build process.
The [Get Team Foundataion Build Parameters] action is a special action that is only useful when a project is launched from TFS. It assigns TFS data to the specified project variables.
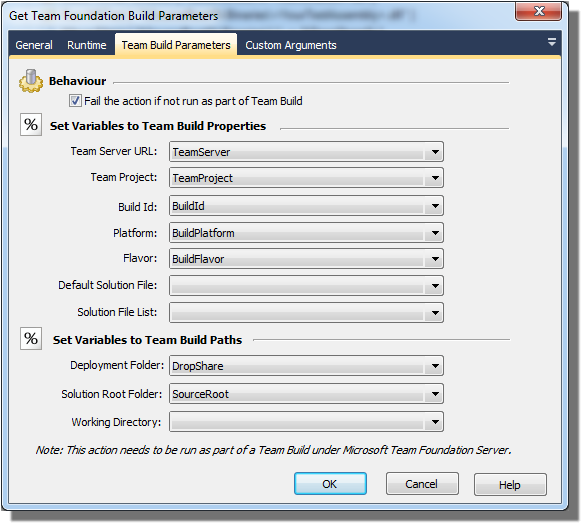
Each of the variables in the [Get Team Foundation Build Parameters] action are as follows:
- Team Server URL: This is the URL of the team foundation server that queued the build.
- Team Project: Is the name of the team project the build belongs to.
- Build Id: Is the unique number allocated to this build.
- Platform/Flavor: These are the build parameters for the compilation of the solution to be built.
- Default Solution File: The solution file listed as the primary for the team project.
- Solution File List: The list of solutions to be built by the build process.
- Deployment Folder: The drop folder configured for the build process. It is blank if it is not set.
- Source Root: The first listed solutions root folder.
- Working Directory: A working directory on the agent for the current build definition. Typically space which is shared between builds made on the same agent.
On the Custom Arguments tab is a list of ten variables which can be passed from the TFS build process to FinalBuilder. These are passed as plain text and converted to the variable types used to read them in the FinalBuilder script.
For my script I only wanted to get the Team Foundation Build Parameters, and the variables that it used. So first I checked out the “BuildVSoftSFTPLibrary.fbp7” project using the built in source control features of FinalBuilder.
First I need to make sure that it is indeed added to source control. If it hasn’t detected that it is part of the TFS source control at this stage I add it to source control. I make sure to select the “Microsoft Team Foundation Server MSSCCI provider” which will use the Team Explorer 2013 installed on the machine. I select the TFS 2013 server and collection I am working with, also making sure the team project is correct. Once this is done I am then able to use the file menu to check the project out ready for editing.
Next I copy all the variables I want from the TFSExample project, and paste them into my BuildVSoftSFTPLibrary.fbp7 project. To paste the variables I open the Variables Editor, right click and select paste.

Last I copy over the [Get Team Foundation Build Parameters] and [Trigger Files Iterator] actions. These use the variables we just copied over and will hook themselves up as they appeared in the example project.

Now we can check in these changes and queue the build.
In the log for the build you will see the following:
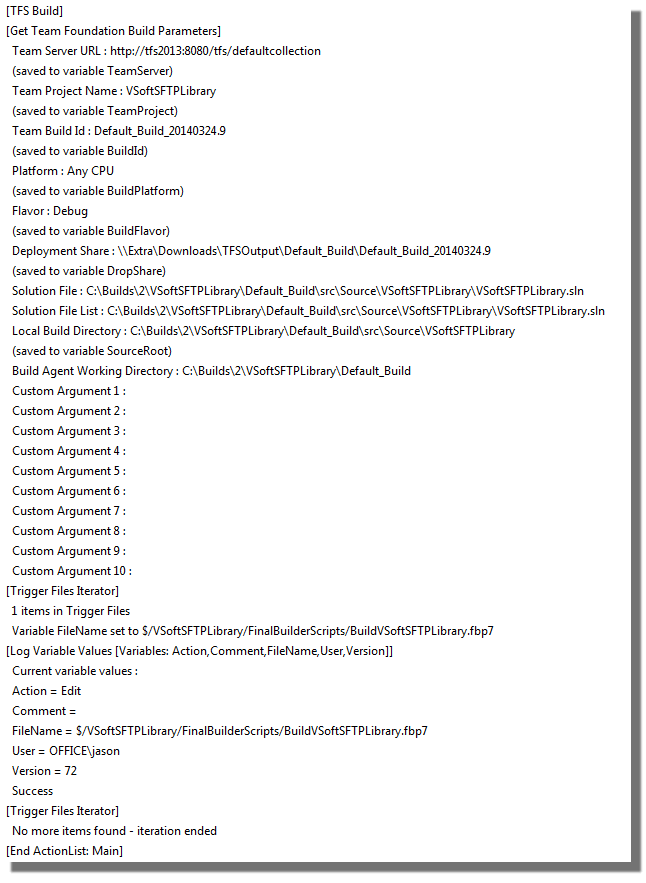
By default the [Get Team Foundation Build Parameters] action will write what it has retrieved from TFS to the build log. Something to keep in mind when debugging a FinalBuilder script in TFS.
So now we want to make the FinalBuilder process take over the build completely. The first thing to do here is to stop the TFS build process from building, testing, and publishing results of the build. This requires changing the build workflow to remove the activities which do this (otherwise we would be doing things twice), and updating the FinalBuilder script to perform these tasks.
Instead of working out which activities to remove from the build template we provide a build template with all the build and testing activities removed. The “FinalBuilderOnlyTFS2013Build.xaml” template which was copied into the BuildTemplates folder is this template.
In the process section of the build definition, create a new build process using the “FinalBuilderOnlyTFS2013Build.xaml” file. You will notice that nearly everything in the build parameters is the same except now the before and after script events have been removed. Also the testing section is no longer present. All of this will be handled by the FinalBuilder script.
Once again open your FinalBuilder project for this build and check it out. Also open up the TFSExample.fbp7 project and take a look at the [Build VS.Net Solution] action. Copy this action to the project used to build your solution.
The [Build VS.NET Solution] action builds a Visual Studio.NET solution. On the [Solution] tab you will see that the Solution File is set to “%SourceRoot%\.sln”. Replace with the name of the solution that you wish to build. Note that “%SourceRoot%” will be the directory of only the first solution in the list of projects to build. In my project I ended up with a Solution File value of “%SourceRoot%\VSoftSFTPLibrary.sln” for the [Build VS.NET Solution] action.
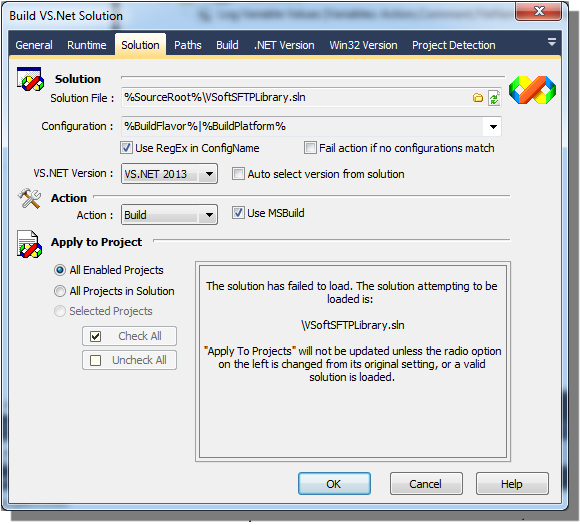
On the [Paths] tab you will see that the Output Directory is set to %SourceRoot%\Binaries. You may change this if you wish, but it's it not necessary. Note because the drop location may be on a different server to the build agent, it is important that VSTest runs on files located on the build agent machine. Unless you explicitly set up the trust relationship, .NET will not allow executing of assemblies on remote machines. This is why we build and test in a directory under %SourcesRoot% and then move the files to the drop location after testing. This will be covered more in the next section.
On the agent the TFS agent the FinalBuilder options for Visual Studio will need to be set. If not and DEVENV.COM is required, the build will fail about the build tool location being unknown.
Now we are ready to run the build with using just FinalBuilder. Queue the build again and the project will build, not from a template activity but from the FinalBuilder script it is running.
To perform testing we need to add a [Run VSTest.Console] action to the FinalBuilder project. The [Run VSTest.Console] uses VSTest.Console to run your test assemblies. On the [Settings] tab add the name of your test assembly to the list. You should end up with something along the lines of “%SourceRoot%\Binaries\.dll”. On the [Publish Results] tab the action should be set to automatically publish the results to the TFS server. This means that after the tests are run they will automatically be stored with the build on the TFS Server.
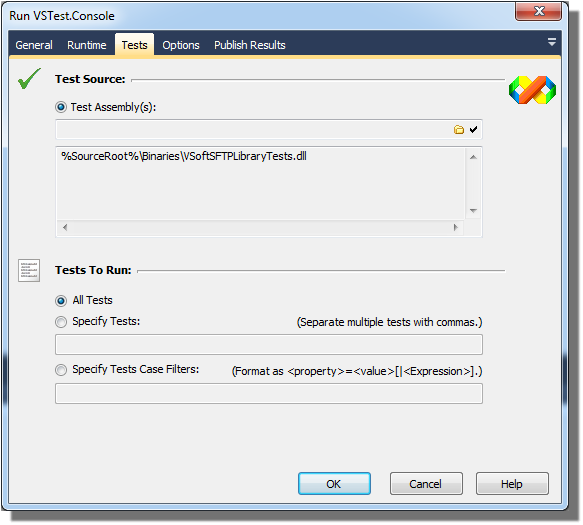
Note that the [Ignore Failure] option, located on the [Options] tab, is important. If any unit tests fail, the [Run VSTest.Console] action will fail, and setting [Ignore Failure] allows the FinalBuilder and TFS builds to continue. Un-check [Ignore Failure] if you would prefer the build to stop on failed tests. In either case, test failures will appear in the TFS build log and in TFS reports.
On the agent the TFS agent the FinalBuilder options for VSTest.Console will need to be set. If not, the build will fail with an error about the VSTest.Console location being unknown.
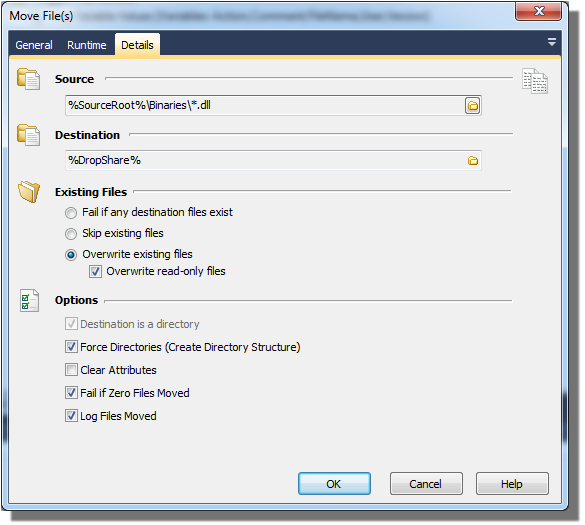
The last step to complete the process is to move all the files from the agent to your drop location. The simplest way to achieve this is by a [Move File(s)] action. We already have the drop folder location stored in the %DropShare% variable. It is this value which we then use in the [Move File(s)] action.
Once this is run we will have a built solution, with tests run, and the binaries copied into the specified drop folder.