In this post, I'm going to look at how to structure a FinalBuilder project so that it will run on your dev machine, or on your Continua CI Server without modification. This allows the best of both worlds, develop and debug your build process on your development machine, and then later run it on your CI server.
I'm going to assume you are familiar with FinalBuilder to speed this along.
Version Control
The very first thing we need to do is add our FinalBuilder project to our version control system. This will ensure that the Continua CI agent will be able to access the projects.
We typically create a Build folder in each repository that has our FinalBuilder projects, installer scripts etc. Make sure you save your projects in uncompressed format (ie, .fbp8 for FinalBuilder 8), as that will make it possible to diff project file changes using your usual diff tool (we use Beyond Compare 4).
So in a typical repository, you might have a folder structure that looks something like this :
        \Build
        \Src
        \Docs
        \Help
        \Tools
        \Output
Note the Output folder is ignored by our version control system (via .gitignore or .hgignore for example). Don't forget to add ignores for the finalbuilder log file as you don't want to commit that to the repo.
This is the file structure I'll be using as the example in this post.
Build Workspace
Continua CI runs each build in a separate, clean build workspace folder. The reason for this is to allow multiple builds of the same configuration to be run concurrently (for example, building different branches at the same time). This means our folder structure above will be rooted differently for each build. So to deal with this, we will define some FinalBuilder Project Variables.
FinalBuilder Variables
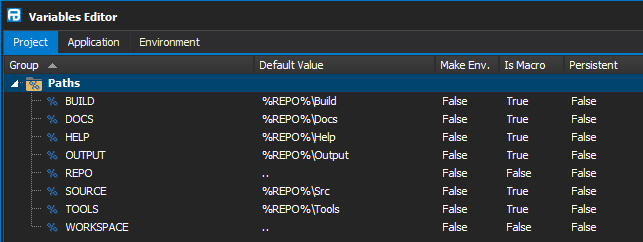
You can of course modify these variables to suite your needs. The REPO variable has a default value of "..", we will use the Path Manipulation action to expand that relative path when our build starts, using the FBPROJECTDIR variable as the base path. This will give us the root folder of our repository, which we can then use as the basis for other path variables.
Side Note: FinalBuilder does not support using unrooted relative paths. The best practice is to fully expand the relative path before using it. Relative paths need to be relative to something, and in windows that is typically the Current Directory for the process, however this is not viable in a multi-threaded application. Rooted relative paths (e.g "%SOURCE%\.." ) will work in most cases, however some windows api functions do not support relative paths at all.
The WORKSPACE variable will have the path to the Continua CI build workspace folder. Depending on how your repository and repository rules are structured, this might be different.
Repository Rules
Continua CI configurations can have multiple Repositories assigned to them, for example when building FinalBuilder, we have mulitple repos on the configuration, one for our source and three others for libraries. On our dev machines, we use symlinks to map the libs folder into our main repo's path, so we end up with :
        MainRepo\Src
        MainRepo\Libs <- symlink to LibsRepo\
This makes it easier to deal with search paths in Delphi, as we can just use simple relative paths. With .Net, working with libraries is so much simpler due to package managers like nuget or packet.
At the start of a Continua CI Stage, the source code is exported from the Repository Cache (a Mercurial repo) for each repository associated with the Configuration. How and what gets exported is controlled by the Repository Rules for that Stage.
The default rules looks like this :
$Source$ >> Source
This will export all associated repos to a folder structure like this
        workspace\source\repo1
        workspace\source\repo2
In this example, I'm going to change the rules to mirror the folder structure on our dev machines :

This results in the following folder structure :
        workspace\build
        workspace\src
        workspace\libs
Note that you can also use rules to limit which parts of the repository are exported to the workspace, so, for example, if you have files in the repository that are not needed for the build process, you can avoid exporting them and save some time (I/O is usually the biggest overhead) using exclusion rules.
Getting back to our FinalBuilder variables, we can see from the above folder structure, that our WORKSPACE variable will have the same value as the REPO variable. If your folder structure is different then you will need to adjust accordingly.
Continua CI Stage Actions
Ok, so now we have a basic FinalBuilder project, and Repository Rules set up to export our source to the build workspace, now it's time to call FinalBuilder. Continua CI has a FinalBuilder Action for doing just that.
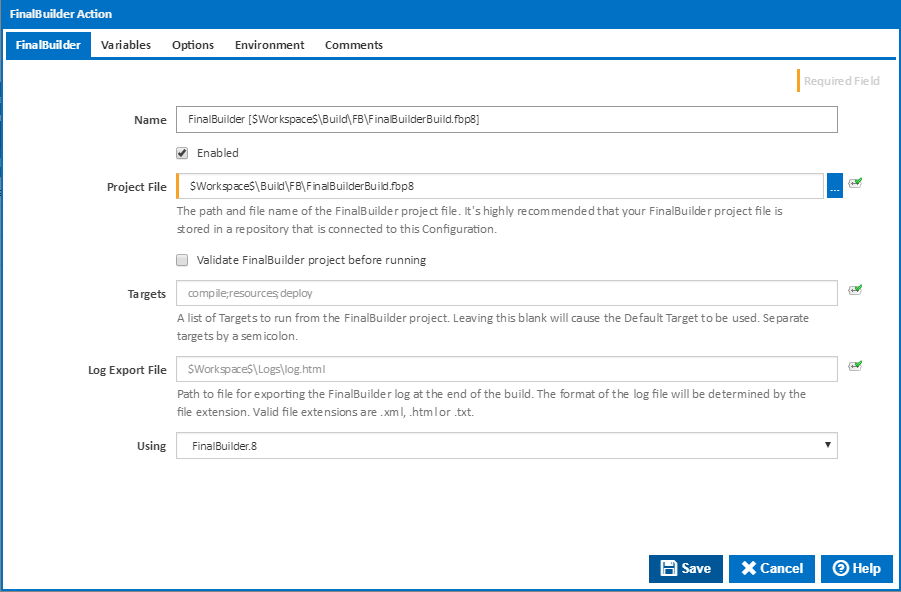
We need to tell the action where our FinalBuilder project file lives. This needs to be anchored by the workspace folder, e.g $Workspace$\Build\FB\FinalBuilderBuild.fbp8
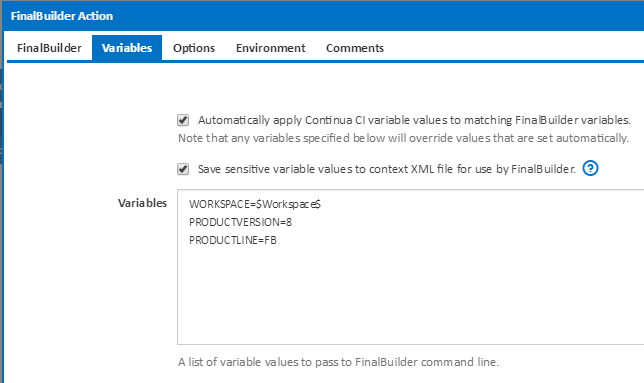
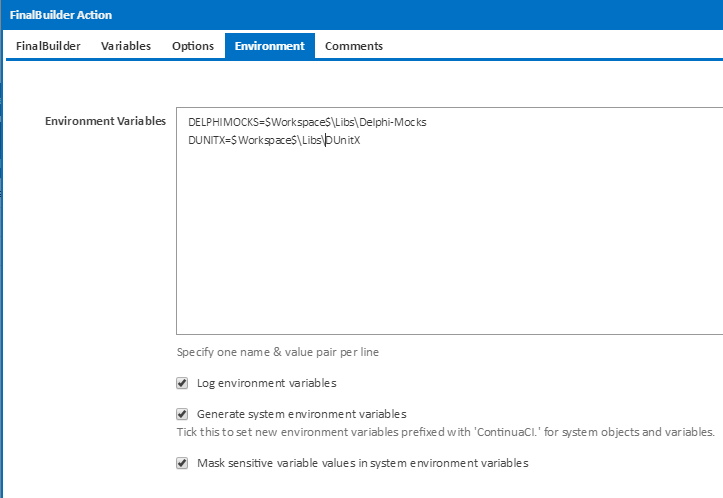
In the Variables tab, we will check the "Automatically apply Continua CI variable values to matching FinalBuilder variables." Option. If you want to send any protected Continua variables (ie passwords, api keys etc) to FinalBuilder, then check the "Save sensitive variable values to context XML file for use by FinalBuilder." option as well. Lastly, on the Environment Variables tab, we are passing some environment variables that are used in delphi search paths to FinalBuilder.
We also set some environment variables that are needed for our build process, Continua CI makes this painless.
FinalBuilder Project
Remember that we want to be able to run the project on our dev machine and from Continua CI. So some logic is required to make sure it behaves the same way in both environments.
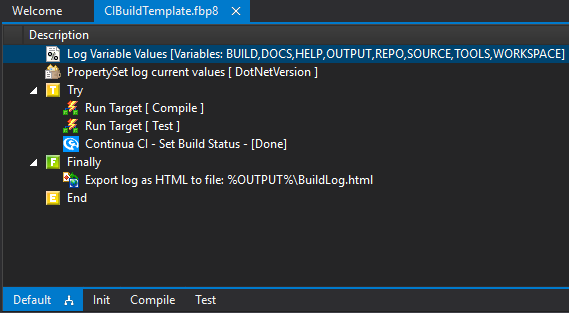
I added some targets to the project, Init, Build and Test.
The Init target is a dependency of the Default target, so it will always run first. This is where we initialise the variables, detect if the project is running from Continua CI or not, and set version info. We also create the Output folder here.

Back in the Default target, we call the Build and Test targets. This is wrapped in a try/finally block and we export the FinalBuilder log file to %OUTPUT%\BuildLog.html in the finally section. We can register this file as an artifact and create a report definition in Continua CI to make it easy to view in the Continua CI UI. I've covered this before in an earlier blog post, so I won't cover it here.
Note that you don't have to do the whole build/test/deploy all in one FinalBuilder project. When building FinalBuilder, we do the build & test in one project, and the deploy in another that is called from the Deploy stage. This avoids the temptation to deploy from a developer workstation!
When we build Continua CI (on Continua CI of course), we have separate Build, Obfuscate, Test, Package & Deploy Stages that use different FinalBuilder projects. This allows us to run different parts of the build process on different agent machines. The .net obfuscation tool we use is very expensive, so we only have a single license which is installed on one agent machine, so the obfuscation stage will only run on that agent machine (vm). Continua CI selects the best agent based on agent properties and the Stages Agent Requirements. I'll cover this in more detail in another blog post.
I have added this example project to the Examples repository on GitHub.