Continua CI includes support for running and reporting on Unit Tests, in this post we will take a look at running DUnitX Unit Tests. If you not familiar with DUnitX, it's a newish Delphi Unit Test framework, I blogged about it recently.
I'm not going to cover how to get up and running in Continua CI, but rather I'll focus on the Unit Testing support. If you are not familiar with Continua CI, take a look at this recent post which describes how to build Delphi projects with Continua CI.
Assuming you have you Continua CI Configuration all set up, lets take a quick look at how to integrate our unit tests into the build process. You need to build a console application, and make use of the xml logger. This is how the dpr of our typical DUnitX console test application might look :
var
  runner : ITestRunner;
  results : IRunResults;
  logger : ITestLogger;
  xmlLogger : ITestLogger;
begin
  try
    //Create the runner
    runner := TDUnitX.CreateRunner;

    //add a console logger, pass in true to specify quiet mode
    //as we don't need detailed console output.
    logger    := TDUnitXConsoleLogger.Create(true);
    runner.AddLogger(logger);

    //add an nunit xml loggeer
    xmlLogger := TDUnitXXMLNUnitFileLogger.Create;
    runner.AddLogger(nunitLogger);

    //Run tests
    results := runner.Execute;

    {$IFDEF CI}
    //Let the CI Server know that something failed.
    if not results.AllPassed then
      System.ExitCode := 1;
    {$ELSE}
    //We don;t want this happening when running under CI.
    System.Write('Done.. press  key to quit.');
    System.Readln;
    {$ENDIF}

  except
    on E: Exception do
    begin
      System.Writeln(E.ClassName, ': ', E.Message);
      System.ExitCode := 2;
    end;
  end;
end.
The key thing to remember, is that this application is going to be running unattended, so never use ReadLn or any sort of interaction/prompting for input etc. If I had a dollar for every "Finalbuilder/Continua CI hangs during my build" bug report in the last 13 years, I'd be a... well not rich, but a few hundred dollars better off! Notice I used $IFDEF CI above to set the exit code to 1 if not all tests pass.
So the next thing we need to is actually get the console application building in Continua CI. I covered building delphi applications with Continua CI in earlier post, so I'll just highlight a few things specific items that we need. Firsly, if you don't have the DUnitX source code in your repository, and have configured a repositoroy for it in Continua CI, then you need to update the Search Path for your console application. If you are using MSBuild to build the console app, then it's done on the Properties tab of the MSBuild Action :
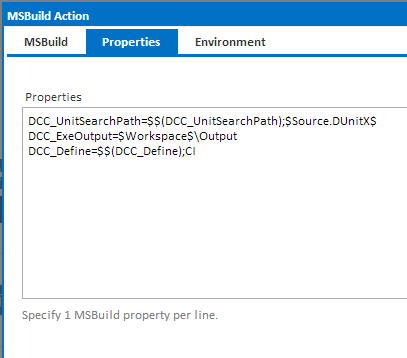
I have DUnitX in a Continau CI repository named DUnitX, and I've used the default path to the repository in the workspace ( $Source.DUnitX$ translates to "/Source/DUnitX" in the build workspace). If you are using FinalBuilder, you need to pass that to a FinalBuilder variable in the FinalBuilder Action, I'll cover that in more detail in a future post. Notice I also set the CI define I used in my code. The other important setting, is the ExeOutput path, which much be somewhere inside the build's workspace, so I set it to $Workspace$\Output - Continua CI will translate $Workspace$ at build time to be the workspace folder for the build (each Continua CI build gets a clean unique workspace folder).
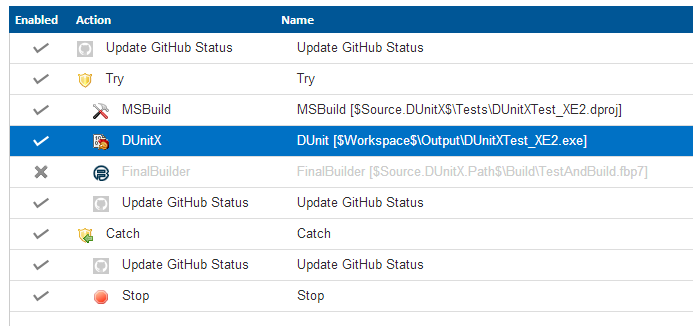
Now it's time to add our DUnitX action, somewhere in the stage workflow after we have built the test application.
Setting up the DUnitX action is quite simple :
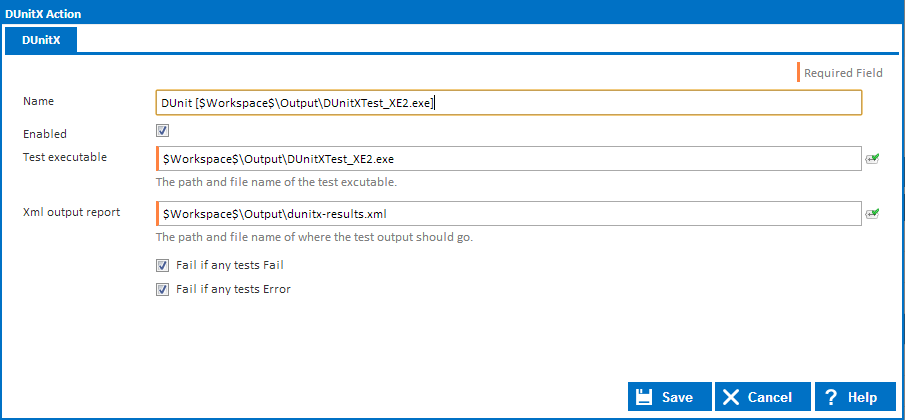
We set the Test Executable to our test console app, which in the MSBuild action we configured to be output to $Workspace$\Output - and we specify where to put the xml file that DUnitX will generate (because we added the NUnit logger). The other two options control whether the to fail the Action/Build if any tests fail or error. If you have more than one Unit Test action to run in your build process, then it's bests to leave these unchecked and use the Stage Gate feature (on the Stage Options dialog) to fail the build (more on this later).
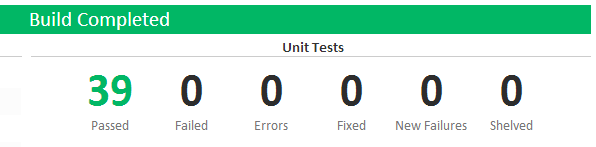
After running the build, the Unit Test results appear in a two places, firstly the Build Details page, which shows the totals for the build (for all unit tests run) :
You can drill into the tests by clickong on the numbers, or by clicking on the Unit Tests tab :
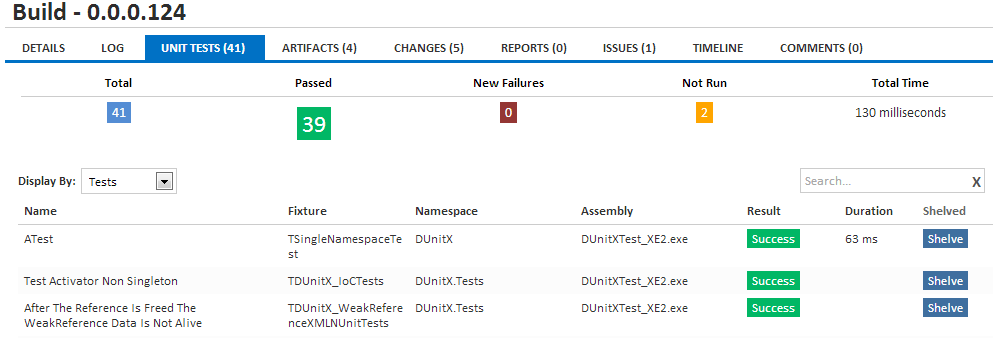
This page allows you to filter by status (click on the numbers), and filter by Fixture, Namespacve etc. The first time a test fails, it will show up inder the New Failures category and under Failures. Clicking on a Failed or Errored test expands the row to show the error message logged by the test framework :
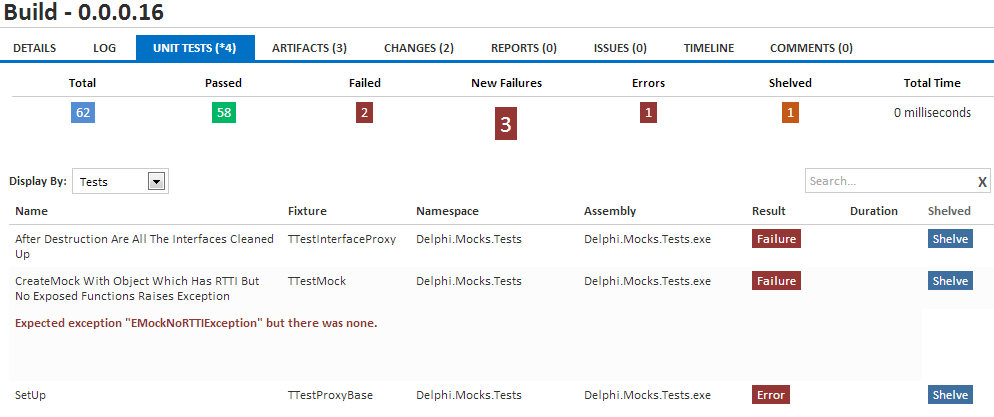
Notice the Shelve button next to each test. If you have a test that always fails, and you don't want it to cause the build to fail, shelving the tests tells Continua CI to ignore those failures in the future, until you unshelve them.
One last feature which I touched on, is the use of Stage Gates to fails the build. Continua CI collects a bunch of metrics during the build, and we can use those metrics in Stage Gate Conditions to fail the build if for example, there are any failing tests. Each Stage has it's own Gate Conditions, which are evaluated once the stage completes.. When the build fails at the Stage Gate, you will see the output of the condition expressions (note, the expressions below are the defaults on all stages) :
